
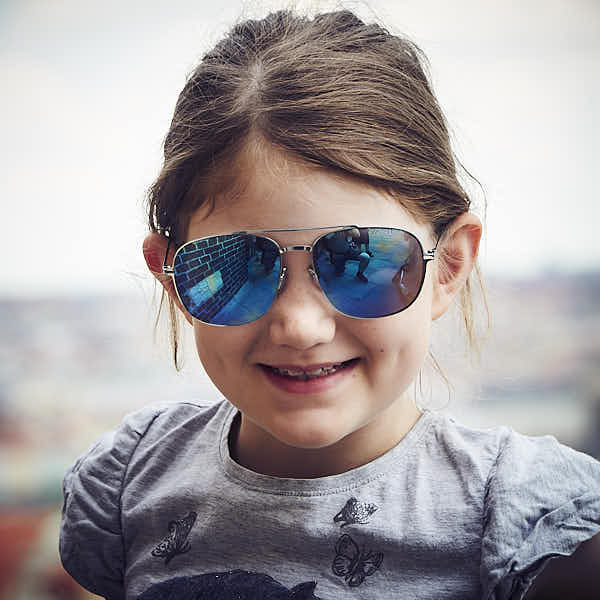
“How to get a blurry background” is arguably one of the most researched topics in today’s photography. The reason for this being such a compelling aesthetic is, pardon the pun, clear: the blurred background brings the true subject into sharp focus.
Your eye wants to draw naturally to the sharpest thing in an image. If you want your subject to be where the eye is drawn to immediately, achieving a good blurred background is the sure way to do this. Your eyes are then led around a pleasant blur of shapes and colors, softening the overall look. This softening is more pleasing to the eye than to many sharp edges.
There are always ways to blur a background in post-processing, and many tutorials on how to achieve different effects in this way to be found all over the internet. However, it looks much more organic and pleasant if the effect can be achieved at the moment in the camera.
Alterations to the Camera Settings
With cameras today, there are so many settings, sometimes it’s hard to track which settings help create which effect. When you are making a blurry background in your image, the settings in your camera are mostly centered around your aperture settings.
Engage Aperture Priority Mode
How sharp or blurred your background depends on where light is allowed to pass through the lens. What you see on your camera’s settings directly related to the aperture is your F-stop, which you will see as f/1.2 (for example f/1.4 or f/8).


Here is where it gets a bit confusing. When your aperture is set wide open, the more light gets through, the blurrier the background – and the smaller the F-stop number. In reverse, a sharper background is a result of a smaller aperture, less light, and a larger F-stop number.
To achieve most of your blurred background, setting your F-stop to less than f/2 (f/1.4 – 1.8 is a great place). Luckily, there are some settings on your camera that can help make sure that the F-stop doesn’t change in the automatic settings.
Most DSLRs have an aperture priority mode or a scene-setting labeled “Portrait”. These settings coupled with your setting of the lowest F-stop you can help you create a blurred background.
Go Manual Mode
Automatic mode can be a lifesaver when working with moving subjects especially. Taking your camera out of automatic can seem daunting, even downright scary, especially for novice photographers.

Most of the time if you do switch out of the auto, you can still go into the aperture priority mode or the portrait scene. Another great reason to switch out of auto is to practice seeing what your camera can do – especially when you’re nervous! Practice really does make perfect, after all.
Go Long! A long focal length creates a blurred background
Lenses are not cheap, we all know this. Lenses also get complicated with zoom lenses versus prime lenses. If achieving that beautifully blurred background is a priority to you, then investing in a lens to create that will help.

Focal length makes a big difference in the clarity of the background. The longer the focal length, (the higher the mm) the more blur you can achieve. We know, your adding more equations to something that seems complicated – but it is worth it.
Just remember, to achieve a beautifully blurred background, lower F-stop, on aperture priority setting, higher mm number. Write it down somewhere and carry it in your camera bag!
What if you can’t get your F-stop as low as you can go? What if your lens is a standard to the DSLR kit you purchased with f/5.6 as the lowest? It may be time to invest in a new lens or two.
Some lenses are a lower focal length, like a 50 mm that offers an F-stop of f/1.8, f/1.4 or f/1.2 that will do the trick great. If you can swing it though, try to go for a prime lens that is more in the 135 mm range.
If you are more comfortable working with zoom lenses, which many photographers are, make sure you again go for that long focal length. 70 – 200mm lenses are great – try not to shoot at either extreme end to avoid things like chromatic aberrations while trying to achieve the perfect blur.
Get Some Distance – and Get Closer
Subject placement is important in many aspects of photography: whether you are obeying the rule of thirds, trying to get a dynamic view with a tiny subject, or creating a great blurry background.
Are you confused yet? Let’s add another great technique that may seem like yet another formula you need to memorize.
Take your subject and place them as far as is possible from the background. Let’s imagine you’re taking an image of a kiddo in an adorable little hat in front of a gorgeously lit Christmas Tree, and want to get that perfect bokeh effect.
Place the child as far from the tree as possible and you can get that beautiful glow in the background – IF you are close to the child. That’s right, the formula for success here is subject far away from the background, photographer close to subject.
Go ahead and write that one down too.
There’s Always Another Chance
The good news is, even if you have tried all of these methods, and you still haven’t achieved the level of blur that you envisioned, you still have an opportunity to see your vision through.
Most editing software today has made it easier on how to get a blurry background by automating it. Adobe Photoshop offers tools like the Iris Blur that can create a pretty similar effect for what you are looking for.
Sometimes these tools don’t give you quite the blur you’re looking for. The good news is, with practice, you can learn how to manually create the blur to whatever degree you want by following steps in Photoshop or Affinity Photo and using tools like filters and layers.